Super Simple State Machines
Confidence: Some CS/EE undergrad training, and I've implemented state machines in various forms over the past couple of decades.
State management is a perennial problem in computer programming. Some modules start out with complex state requirements. Others begin simply, but gradually grow more complex as features and requirements are placed on top of the original code.
It’s easy to end up with an unmanageable tangle of semi-correlated variables and fragile checks for various permutations of those variables littered throughout the file. I’ve experienced this many times myself, adding additional variables to track whether a particular aspect of a component is open or closed, focused or not, updating or waiting for input, and so on.
Updating code like this after months of not looking at it becomes a strenuous mental exercise, as you try to remember what you were thinking when you wrote a particular if clause or wrote a comment that must have made sense six months ago but now has lost all context. And that’s even assuming it was your code in the first place and there’s something to actually remember.
This ad hoc method of adding state to components has problems. A more disciplined approach can reduce bugs, enhance testability, and make later modifications easier. State machines are one way to do this.
In this series of articles, I’ll start by converting a small component to use a state machine, and progressively introduce more features and ways to deal with state changes. Later in the series I’ll cover the popular XState library as well, which provides a lot of nice features for more complex implementations.
So let’s start with an especially simple example. I have been writing a small Electron application for trimming video files. One part of this application is a dialog box that tracks the progress of a video encoding task. The dialog shows the progress of the video encoding, handles errors, and allows cancelling the process. Its state could be modeled with a few different boolean variables and some event handlers.
The code samples here use Svelte and skip some boilerplate and other mundane details, but the syntax should be readily familiar even if you haven’t worked with it before.
A Bunch of Booleans 🔗
One obvious way to represent the data involved in the dialog is by listening to events from the video encoder, and keeping track of what has happened so far.
let started = false;
let error = false;
let cancelling = false;
let done = false;

let errorMessage = null;
let progress = { percent: 0, fps: 0 };

encoder.on('encode-progress', (data) => progress = data);
encoder.on('encode-start', () => started = true);
encoder.on('encode-end', () => {
  if(cancelling) {
    closeDialog();
  }
  done = true;
});
encoder.on('encode-error', (message) => {
  errorMessage = message;
  error = true;
});
Then some UI. I haven’t made it look nice yet as of this writing, but here’s what it looks like right now.
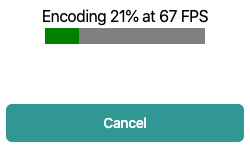
We have a label at the top, a progress bar, and a button. The code to support this looks at the boolean flags and decides what to show in the dialog:
<div>{label}</div>
{#if showProgress}
<progress max="100" value={progress.percent}>{progress.percent}%</progress>
{/if}
<button on:click|once={handleButton}>{buttonText}</button>

<script>
let label;
let buttonText;
// $: tells Svelte to rerun this whenever the variables change.
$: showProgress = started && !(done || error);
$: {
  if(error) {
    label = 'Failed: ' + errorMessage;
  } else if(done) {
    label = 'Done!';
  } else if(started) {
    label = `Encoded ${progress.percent}% at ${progress.fps} FPS`;
  } else {
    label = 'Starting...';
  }

  if(done || error) {
    buttonText = 'Close';
  } else if(cancelling) {
    buttonText = 'Cancelling...';
  } else {
    buttonText = 'Cancel';
  }
}

function handleButton() {
  if(done || error) {
    closeDialog();
  } else if(!cancelling) {
    encoder.cancel();
    cancelling = true;
  }
}
</script>
This is a very simple example, but as code grows this “bunch of booleans” style of state representation can become a problem. At each step, we have to consider the various values of all of the flags, and moreover they have to be checked in the correct order.
Tests help, of course, but tests won’t catch any edge cases we fail to consider, and as more flags are added, the number of edge cases and invalid states can grow exponentially. Eventually it becomes unsustainable, so let’s get ahead of that before it becomes a real problem.
Make Invalid States Unrepresentable 🔗
Yaron Minksy of Jane Street Capital coined this phrase.
One important way to make our state manageable is to make invalid states unpresentable. If it’s impossible for the code to get into an invalid state in the first place, then we don’t have to worry about checking, testing, or handling it.
The dialog has four related boolean variables with a total of sixteen potential combinations. The cardinal rule of a state machine is that is can only ever be in one state, so we’ll reduce this to just one variable with five states.
const WAITING_TO_START = 0, ENCODING = 1, CANCELLING = 2, DONE = 3, ERROR = 4;
let errorMessage = null;
let progress = { percent: 0, fps: 0 };
let state = WAITING_TO_START;
encoder.on('encode-progress', (data) => (progress = data));
encoder.on('encode-start', () => (state = ENCODING));
encoder.on('encode-end', () => {
  if(state === CANCELLING) {
    closeDialog();
  }
  state = DONE;
});
encoder.on('encode-error', (message) => {
  errorMessage = message;
  state = ERROR;
});
The various booleans are now all represented by a single state variable. We retain the progress and errorMessage variables. This type of extra data is sometimes called the “context” of the state machine. For now the context variables and the state don’t really interact, but in more complex state machines the context and the state can have more effect on each other. I’ll cover that later in this series.
So although we’ve converted our state code, it’s not really a big change so far. We’ll make more improvements here soon. Let’s look at the UI functions.
$: showProgress = state === ENCODING;
$: switch(state) {
  case WAITING_TO_START:
    label = 'Starting...';
    buttonText = 'Close';
    break;
  case ENCODING:
    label = `Encoded ${progress.percent}% at ${progress.fps} FPS`;
    buttonText = 'Cancel';
    break;
  case CANCELLING:
    label = '';
    buttonText = 'Cancelling...';
    break;
  case DONE:
    label = `Done!`;
    buttonText = 'Close';
    break;
  case ERROR:
    label = 'Failed: ' + errorMessage;
    buttonText = 'Close';
    break;
}

function handleButton() {
  switch(state) {
    case WAITING_TO_START:
    case ENCODING:
      encoder.cancel();
      state = CANCELLING;
      break;
    case DONE:
    case ERROR:
      closeDialog();
      break;
  }
}
There’s no longer any need to check different combinations of variables or to be sensitive to the order in which we check them. Now it’s easy to follow both the code and the reasoning behind it. We just look at state to determine what to do.
Controlling State Transitions 🔗
While the code is cleaner, one wrinkle with this change is that there’s no control over how we transition between states. If the dialog receives an encode-error event, it will enter the ERROR state, but if the encoder later sends an encode-end event, the dialog enters the DONE state and the error message disappears. The user might not even know an error occurred and then wonder why the output video file isn’t there.
With a small change, we can solve this problem and control how each state responds to each event.
const transitions = {
  [WAITING_TO_START]: {
    'encode-error': ERROR,
    'encode-start': ENCODING,
    'encode-cancel': CANCELLING,
  },
  [ENCODING]: {
    'encode-error': ERROR,
    'encode-end': DONE,
    'encode-cancel': CANCELLING,
  },
  [CANCELLING]: {},
  [DONE]: {
    'encode-error': ERROR,
  },
  [ERROR]: {}
}

function stepState(event) {
  let nextStates = transitions[state];
  let nextState = nextStates[event];
  if(nextState) {
    state = nextState;
  }
}
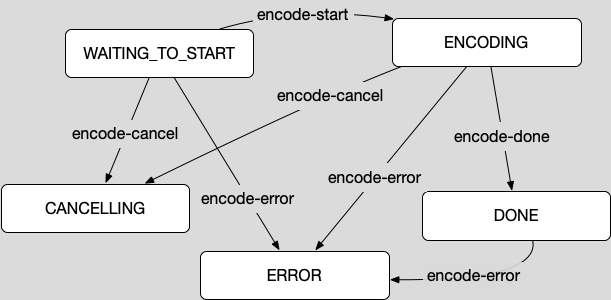
If we’re in the ENCODING state and receive an encode-error event, we go into the ERROR state. The ERROR state lists no events, which means that once we end up there, we’re in the ERROR state regardless of what happens afterward. In state machine parlance, this is called a “final state.” Receiving an encode-done event will keep the state machine at ERROR, and so there’s no need for special logic to make sure that we don’t inadvertently switch into an undesired state.
We can put together a diagram to visualize the state machine too. In this diagram, each box is a state and the arrows represent the various ways we can move between the states. State diagrams like this are invaluable for getting an overall picture of how a complex state machine functions.
So, with this data structure in place and the function to handle the events, we alter the code to use stepState instead of setting the state directly.
encoder.on('encode-progress', (data) => (progress = data));
encoder.on('encode-start', () => stepState('encode-start'));
encoder.on('encode-end', () => {
  if(state === CANCELLING) {
    closeDialog();
  }
  stepState('encode-end');
});
encoder.on('encode-error', (message) => {
  errorMessage = message;
  stepState('encode-error');
});

function handleButton() {
  switch(state) {
    case WAITING_TO_START:
    case ENCODING:
      encoder.cancel();
      stepState('encode-cancel');
      break;
    case DONE:
    case ERROR:
      closeDialog();
      break;
  }
}
Not a huge change in the code, but it adds a lot of robustness. This code doesn’t have to adapt to changes in how the events arrive, and any potential bugs are completely prevented. What we have now, a list of states and a set of transitions between them, sets up the bare minimum of a “Finite State Machine.”
One remaining messy part is in the interaction with the outside world. The code still manually checks when to call encoder.cancel or closeDialog, and it would be nice to automate these calls as we move through the state machine. In part two of this series, I’ll touch on a bit of state machine theory, and in doing so set up the ability to handle these cases nicely.